|
|
|
Spice 'N' Tadka
Blog URL: Spice 'N' Tadka

Sun, 20 May 2012 07:25:00 +0000
baking, cookies, kid friendly, yogurt
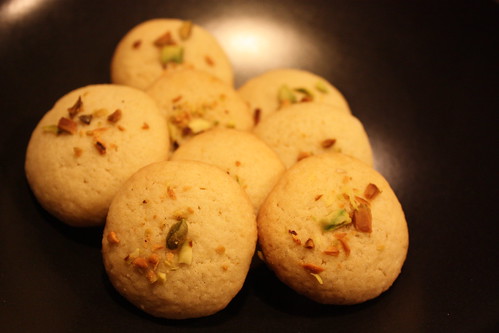
Nankhatai - Traditional Indian Cookies
Nankhatai are traditional Indian cookies similar to shortbread cookies but not as dense and flakier. I tried few recipes and finally found one that works. I followed this recipe but made quite a few changes based on the other recipes I had tried before. It turned out pretty good but like with any baked snack it can take a few times to get it right.
Ingredients
Unsalted Butter 1/2 cup (1 stick)
Sugar 1/2 cup
Cardamom Powder 1/4 tsp
Maida 1 cup
Baking Powder 1/4 tsp
Salt 1/8 tsp
Cornflour 2 tsp
Sooji/Rava 1/4 cup
Besan/Gramflour 2 tbsp
Yogurt 2 tbsp (optional)
Pistachios 8/9 chopped
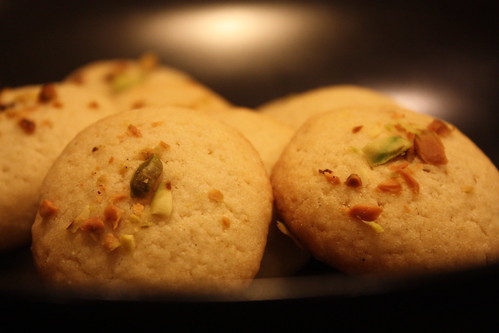
Beat butter and sugar until well blended and light and creamy. Add the cardamom powder and cornflour. Sift maida, sooji and besan along with baking powder and salt. Add the flour mixture to the butter/sugar mixture and make sure they are well blended. If needed add the yogurt and form a dough. Put the dough in the fridge for 15/20 minutes to firm up. Meanwhile preheat the oven to 300 degrees. Cut the dough into equal size portions based o the desired size and form rounds preferably with no cracks and form in the shape of a peda. Arrange the pistachios on top. Place them on a cookie sheet lined with parchment paper. Bake for about 21/23 minutes and let them cool for about 10 minutes on a cooling rack.
| Sun, 20 May 2012 06:54:00 +0000
curry, Paneer
Paneer Butter Masala - Quick and Easy version
Quick and simple home made version of the paneer butter masala found at most of the restaurants. One of the most ordered dishes at restaurants but this one does taste quite different from the typical restaurant taste. Wish very simple ingredients its a very easy recipe and can be made quickly. Basic ingredients are Paneer, cream, tomato puree and kasuri methi. Kasuri methi is very important as it adds a very distinct flavor to the dish and complements paneer and cream very well.
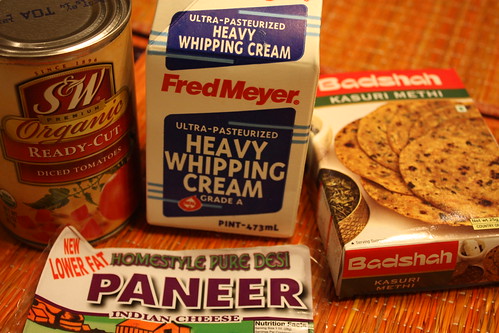
Ingredients
Paneer 1 cup diced
Tomato 4 pureed or 1 can
Cream 1/2 cup
Kasuri Methi 3 tsps
Red chilli powder 2 tsp
Garam masala 1 tsp
Salt to taste
Jeera 1 tsp
Oil 1 tbsp
Cinnamon stick 1
Cloves 3
Bay leaf 1

Heat oil in a pan and add the whole garam masalas and jeera. Once they crackle add a tspn of the kasuri methi and let it fry and next add the tomato puree and let it cook. Add the red chilli powder, salt and garam masala. Add water if needed but make sure to not make it very dilute. Meanwhile if you prefer you can shallow fry the paneer cubes in oil. Once it boils for minutes add the paneer cubes and let it boils for 2 more minutes. Add the cream to make it of desired consistency and turn it off after a minute. Now add the left over kasuri methi and make sure to crush it a bit before adding it, that will enhance the flavor.
| Sun, 08 Apr 2012 05:21:00 +0000
breakfast, Gluten free, Jowar, kid friendly, snack, yogurt
Jwari chi ukkad -Jowar flour meal
Jowar flour known as sorghum flour is very popular in certain states of India especially Maharashtra and Gujrat. Bhakri made out of Jowar is a staple food for lot. It has very high content of protein and iron make it energy boosting food. It is also gluten free and hence easily digestable. Given all the above, I thought of introducing this to my toddler who loves food. The art of making perfect bhakri is not that simple and I for one am not very good at it. So, I had to be creative and think of some other way of adding it to our diet. Ukkad a popular maharashtrian dish is typicallly made of rice flour and i read a recipe called as 'ukkad pendi' where wheat flour was used as the main ingredient. So, all i did was substitued the flour with jowar flour and used soy yogurt as my son is allergic to cow's milk. A very simple recipe and is very filling and satisfying meal as breakfast or snack. I am not sure if such a dish exists or if it's made with similar ingredients and different name, but I had never come across it lso thought of naming it the way I did.
Ingredients
1 cup Jowar flour
4 tbsp yogurt ( I used soy)
1tsp Jeera
1/2tsp Haldi
1/2tsp hing
Few leaves of
1 green chilli slit vertically
Salt to taste
1tsp sugar
2 cups water
Ghee/oil
First roast the Jowar flour in good amount of ghee for 2/3 minutes. Keep aside and heat some oil or ghee in a pan and the spices as n our regular tadka. Mix yogurt and water and add to the pan and bring to a slight boil. Onc it starts boiling add the flour, salt and sugar. Now keep stirring to avoid any lumps. It shouldn't take very long to cook as the flour is roasted. Withing 2 or 3 minutes the flour will absorb all the water and ukkadJowar will be ready. Serve with a dallop of ghee on top and enjoy!
ghee can be substituted with oil in case you are watching calories but if making it for kids then any amount of ghee is good for them:)
Will post a picture soon. | Thu, 05 Apr 2012 04:42:00 +0000
breakfast, Gluten free, Jowar, kid friendly, snack, yogurt
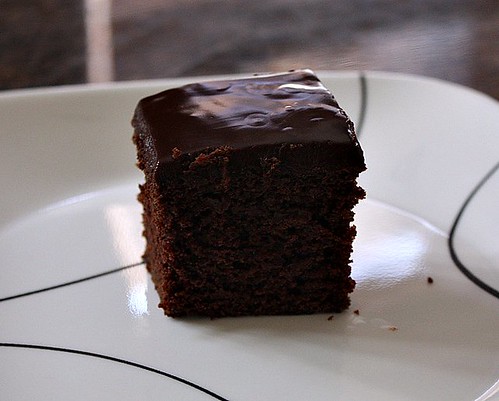
Easiest Eggless Chocolate Cake ever
While browsing through various recipes at one of my favorite sites 'Joy of baking' I came across this recipe for Chocolate which seemed pretty simple and mix in the pan type of recipe. To add to it the recipe was even eggless. Over the years I have tried various recipes for eggless cake and none of them have been as successful as this one. Given its a tested recipe I followed the recipe exactly and it turned out amazing. My friends didn't even believe that it was eggless. I loved the fact that the frosting was made of chocolate ganache rather than the usual butter sugar frosting. It tates amazing warmed up in the microwave for few seconds :-)
| Thu, 05 Apr 2012 04:32:00 +0000
breakfast, Gluten free, Jowar, kid friendly, snack, yogurt
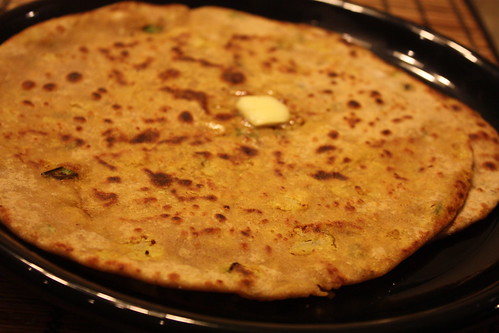
Gobi Paratha
Any form of paratha is a favorite at our house and even my son loves it. It is one of the easiest and best ways of getting veg + bread together. I remember eating gobi parathas made by mom inspired by a recipe from one of her Punjabi friends. The recipe called for fresh grated cauliflower mixed with ginger, green chilli, spices and then stuffed inside the paratha. I have made it with that recipe quite a few times but then with the veg being raw you have to deal with water because of the added salt. It can get a bit clumsy if you are not used to it and are in a hurry. So, this time I used the same ingredients and recipe and instead on keeping the cauliflower raw I sauteed it for few minutes which made the process extremely simple and less clumpsy. Here's the recipe for Gobi Paratha !
IngredientsStuffing1 Cauliflower florets grated 2 Green chillis 1 inch Ginger 1 tsp jeera 1 1/2 tsp amchur powder 1 tsp jeera powder 1 tbsp oil 1 tsp haldi (optional) 2 tsp garam masala (optional) corriander leaves few sprigs salt to taste Dough2 cups whole wheat flour 2 tbsp oil salt to taste water to knead the dough
First we will make the dough by mixing all the ingredients and try to keep the dough a bit tough. Apply oil on top of it and keep it aside for 15 or 20 minutes while we prepare the stuffing. For the stuffing heat oil in a pan and add jeera followed by the green chilli and cauliflower. Now add all the spices including salt and let it cook for about 4 minutes. Now let the mixture cool. To make the actual paratha based on the desired size of paratha makes small balls of the dough. This way we can make sure all parathas turn out to be of the same size. Do the same for the stuffing. Now roll the dough flat and then form into a shape of cup. Add the stuffing and close the opening to make sure its fully covered. Now apply some dough and roll it into circle of desired size. In the meantime heat a tawa on medium heat and add the paratha and cook on both sides. Add some ghee if needed it will enhance the flavor and will make a sizzling sound which just adds to the appetite:)
| Fri, 30 Mar 2012 05:15:00 +0000
Indo-Chineese, Rice, Vegetables
Quick and Easy: Fried Rice and Veg Manchurian
Full of vegetables.. some fried components..but overall a good satisfying meal that we won't feel too guilty about eating on a busy weekday evening. This was one of the quickest meals I made the other day when all I was planning to do was sweet corn soup which is my husband's favorite. Well just the soup wouldn't have been enough so thought of making fried rice but then thought if I am anyways going to take out vegetables and chop them why not make Manchurian too to go with it. In the interest of time I of course didn't follow the regular recipe and made some quick adjustments. All of it was ready within 20 minutes and I felt like I was competing in 'Chopped' and had the veg were the ingredients in the basket :) If you have a food processor in hand and all vegetables then it shouldn't take more than half an hour to get it all done. I luckily had a frying pan with oil in it ready to go so it made it even quicker Fried Rice
Ingredients 2 Carrots depending on size Get the rice going in a rice cooker or in a pan with boiling water. Chop the carrots and green pepper finely. I just put all of it in the food processor. Heat a wok with oil and add the garlic once oil is hot enough. Garlic has to get fried well for the flavor to come out. Add the vegetables and the finely chopped spring onion. Saute for few minutes and once rice is done drain all the water from the rice and add to the wok. Add salt, sauce and pepper and let it cook for some time. Add some spring onion for garnish and its done :)
Vegetable Manchurian
1/2 Cauliflower 1 Green pepper 1 Carrot 1/2 Red onion 2 tsp Tomato ketchup 2 tsp Soy sauce 1 tsp Red chili sauce 1 bunch of spring onion 2 cloves of garlic 1 inch ginger 4 tbsp corn flour salt to taste black pepper
Add all the vegetables except for spring onion in the food processor including garlic and ginger and finely chop them. Heat oil in pan and add part of the vegetable mixture. After few minutes add salt, soy sauce, ketchup and chili sauce if you prefer. Once that is cooking use the left over vegetable mixture and add some corn flour, salt, pepper and very little soy sauce and get it to a consistency which can be made into balls and fried. Fry the Manchurian balls over medium heat and once done add to the gravy. If needed add some water. In case the gravy looks dilute you can always thicken it using corn flour and water mixture, but make sure to be very careful while adding it as it can make it very thick. Add finely chopped spring onion as garnish and you have a quick meal ready !
| Fri, 30 Mar 2012 03:57:00 +0000
combo, healthy, kid friendly, raita, side dish, spinach, yogurt
Palak Raita
Since the beginning of this year I have been trying to have a well balanced full meal at home at least for dinner time which is usually Chapati with some subji or daal along with a side of salad or raita. But most of the days I find myself fighting for time and end up combining two of them in one and doing a daal with a veg like palak or methi. Palak puree is one thing I always have in the fridge these days as its a go to vegetable for my son and easy enough to mix in anything. I even freeze small cubes of spinach puree if I have extra. Coming back to the point my son loves yogurt and on days when he isn't wanting to eat anything else yogurt comes in handy and at least fills up the need of protein and fat. So, the other day when I was getting the yogurt out from the fridge for him I saw the spinach puree by its side and decided to mix it up and add some salt, a pinch of sugar, some jeera powder and I had in front of me a toddler enjoying his yogurt :) Well since I had some left, I did the same for us and we enjoyed it too as spinach raita! I love how it tasted and such an easy and tasty way of including spinach in the diet ..hope you will like it too!
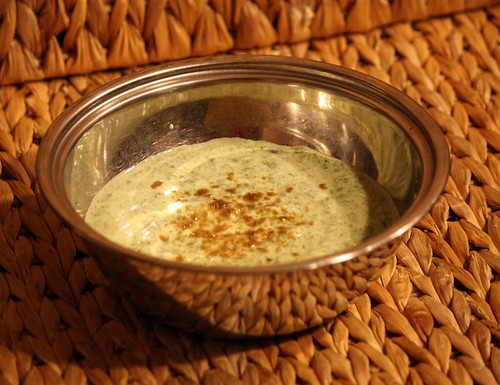
Ingredients
1 cup yogurt 1/2 cup of puree spinach -bunch of fresh spinach blanched and pureed 1 tsp jeera powder 1 tsp sugar salt to taste
a pinch of red chilli powder (optional)
Well the method is very simple and as you probably already guessed it. Just mix all the ingredients in a bowl and enjoy the raita. Sprinkle some jeera powder or red chilli powder on top to add to the color.
A quick variation to this would be to add some peanut powder to it and add red chilli powder and leave out the jeera powder for a Maharashtrian version of 'Palakachi dhyatli koshimbir' ! | Tue, 27 Mar 2012 18:20:00 +0000
baking, coffee
Cranberry Pistachio Biscotti

Coffee/Tea time is one of the most enjoyed times at our house. Whether it is the steaming mysore coffee with lots of milk or masala chai. We always have some snacks o accompany the drink Parle G, rusks, chakli being the favorites. So in the search of a perfect dunking goodness I came across this recipe for biscotti which fits our tastes buds perfectly by being not too buttery and not too sweet while still maintaining the slight crunch even after dunking in coffee. Biscottis are traditionally Italian cookies which are twice baked. The first time I made I didn't have any pistachio in hand so I used almonds instead which worked well too. This is a pretty simple recipe and one of the easiest things to bake. I followed this recipe by Stephanie Jaworski and made just slight modifications which are listed below. Ever since I was introduced to her website by a friend I have been a big fan of hers and love all her videos. You will probably see lot more of her recipes with slight twist in this blog.
Ingredients2/3 cup granulated white sugar 2 large egss 1 teaspoon pure vanilla extract 1 teaspoon baking powder 1/4 teaspoon salt 1 3/4 cups all-purpose flour 1/2 cup pistachios, coarsely chopped 1/2 cup dried cranberries
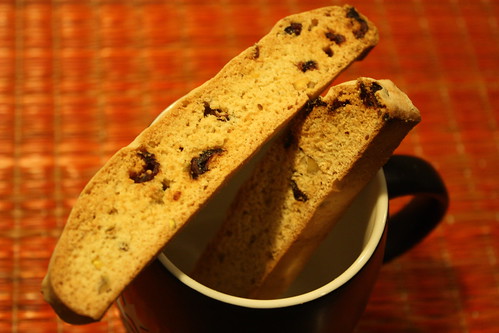
One thing I learnt that is important in baking is having stuff like eggs and butter at room temperature helps a lot. For this recipe first we need to beat the sugar and eggs on high speed until the color turns a bit pale, and starts looking fluffy. Add the vanilla extract and mix. On the side whisk together the dry ingredients and add to the egg mixture. Now we add the nuts and the cranberries and make sure its all evenly mixed. Once done roll the dough into a log shape 12 inches and 4 inches roughly and place it on a baking sheet for about 18-20 minutes until firm to touch. This is where the original recipe calls for 25 minutes but the first time I kept for 25 minutes it turned out to be too hard. Remove and let cool. Cut slices and place the biscotti cut side down and bake is again for about 8-10 mins on each side. This is the twice baking part. And then you have the dunking goodness ready to be dunked in coffee or just enjoyed by it self. Remember since we didn't add any butter or oil in this recipe it is bit more crunchier which is why it is perfect with coffee.
| Tue, 27 Mar 2012 17:26:00 +0000
baking, coffee
First Post
After debating with myself for quite some time whether to start a blog or not I finally decided to go ahead and do it. This blog will be a way to share my adventures with cooking/baking and also the regular daily weekday dinners/lunches. Being promoted to a Mom recently my cooking skills have taken new turns and am constantly thinking about how to make food healthy and interesting plus easy to eat and less mess to clean :) Like I said I will be sharing my recent experiences in the kitchen and hope that the blog will make me want to keep trying out new things ! Hope you all enjoy the journey of 'tastes unlimited' with me. |
|
|